Since all of my things have moved to Michigan to live with Doug earlier than expected (don’t worry, I’ll get there eventually), we decided to “upgrade” a few pieces of basic Sauder furniture to hold us over a few more years and spruce up our space.
Now, I have had some experience with furniture paint in the past – I upgraded my mom’s 1990’s bathroom a few years back – but, I promise, you don’t need to have ANY experience with furniture paint to turn a piece you don’t love into one you do. If you’ve ever painted anything in your life, you’ll be just fine.
I LOVE furniture paint, ya’ll. Seriously, it’s magic. Let’s start with my supply list and then I’ll get into the steps.
Supplies:
- Old piece of furniture you can’t stand to look at anymore.
- A basic latex primer. I used this one. If you’re painting a darker piece a lighter color like I did, use a white primer.
- Foam paint roller like this one. I used a mini size, but depending on the size of your furniture, you may want a larger one. Also, I highly recommend a foam roller for the smoothest paint coverage.
- $2.00 Paint Tray
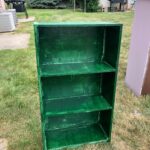
- Furniture paint in the color of your choosing. There are a lot of different brands out there but I prefer Rust-oleum Chalked Paint. It’s a little pricier but it works like a gem. Trust me on this, I tried an off-brand of $7 green paint on a bookcase the same day I did this dresser, and it had terrible results (see below). Again, if you’re going for the lighter colors, get the light tint base. Darker colors = dark tint base. Your local hardware store will have a whole set up for the Chalked paint and even has a little pamphlet to walk you through what to buy.
- Protective top coat in matte, satin, gloss or high gloss finish depending on the look you’re going for. I used Minwax Polycrylic Protective Finish in Satin but you can also use Rust-oleum’s Chalked top coat in matte finish.
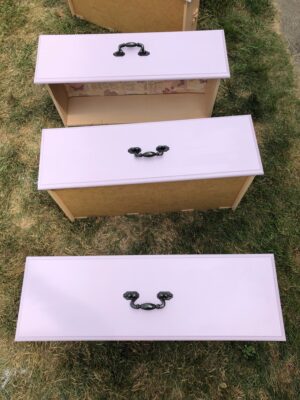
The first piece we upgraded was my college dresser, made by Sauder Woodworking in Ohio, which is so old I don’t have any reference photos for you! And to be completely honest, I was so excited about painting it lavender, that I forgot to take a before picture for all of you. Whoops. So here is a picture of it disassembled and sanded down:
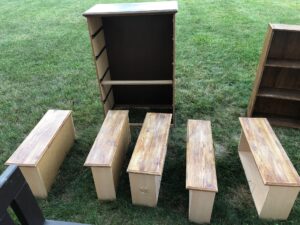
Note: According to Rust-oleum’s Chalked paint instructions, you do not need to sand down any of your surfaces. You should be able to just slap the paint right on there and be done. Originally, I had a different idea in mind for this dresser so we decided to sand it down first with some sand paper. Now, after having done this to several pieces, I’ve learned it’s important to invest in the paint and lightly sanding definitely helped!
Step by Step:
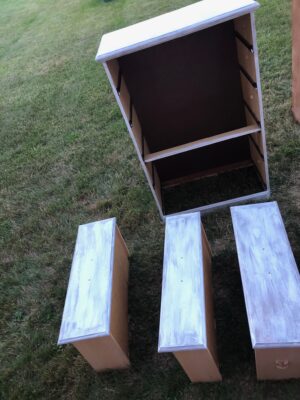
Step 1: Prime all of your surfaces. Since this dresser was a bit on the darker side and I was planning to paint it lavender, I applied two coats of primer. I wanted to guarantee a smooth coverage of purple.
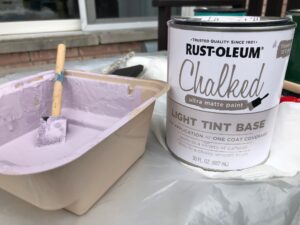
Step 2: Next, prepare your paint while the primer dries. As I mentioned, I wanted a lavender color so I chose Soft Iris. I used the light tint base and had the folks at the paint counter take care of the coloring for me.
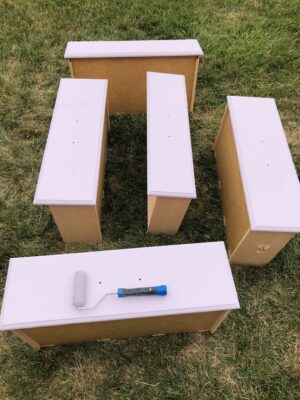
Step 3: Once the primer is dry, you’ll be able to roll on your paint! Be careful if it’s really hot outside. We ran into a few hiccups with Mother Nature during this project. First the heat, which made the paint dry a little too fast, and then it started drizzling and left a few water spots on parts of the paint. It’s OK though, because a quick roll of the brush took care of that right away.
Step 4: After applying a few coats of paint and letting it dry, you’re ready to reattach your hardware. Or upgrade it if you’d like! I used the same hardware that came with the original dresser and I think it looks fantastic. Now, you get to stand back and enjoy your hard work!
Here’s the finished piece:
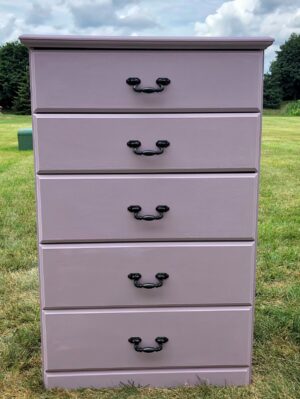
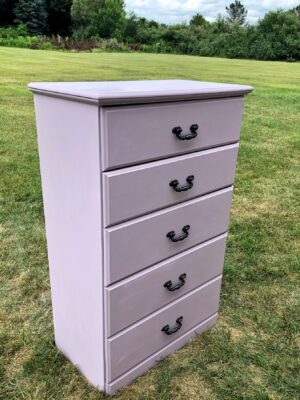
I just LOVE how this dresser turned out. And I love that it has a new life to it. It looks great in the room and has a fresh, updated look! What piece do you plan to upgrade?
If you enjoyed my dresser flip, sign up for my newsletter to never miss a project!
P.S. Here’s the bookcase I mentioned. Pretty awful, isn’t it? Don’t worry, it’s teal and beautiful now. I’ll share that post soon! 🙂
Looks great! I am going to start chalk painting soon too! Bought a very large dining room table to put in my craft room! Yeah!! Your dresser is great inspiration! 😉
Author
Thank you, Karen!! That’s awesome about the dining room table. Please share it with me when it’s all done! I can’t wait to see it. What color are you going to paint it?